I’ve always been a tech enthusiast, especially when it comes to MacBooks, as that was my first tech device. And, that is why I went on to discover a world of hidden Mac tricks that could revolutionize my experience.
The one thing that used to frustrate me a lot was taking a screenshot on devices, especially, Mac, as I often used to fumble with key combinations — always ending up with a half-captured image or a blank screen.
But those days are gone now. And, in this read, I’ll be sharing my favourite Mac screenshot techniques, from all the basic grabs to even the full page captures.
Let’s start!
This probably is one of the quickest ways to capture a screenshot on a Mac. Just all you need to do is remember a bunch of keywords shortcuts and that’s it. Although, you might think that remembering all of these keyword shortcuts would be a complete nightmare, but’s actually quite easy once you get the proper hang of it.
So, here take a look at some of the primary keyword shortcuts that you need to know:

When I first got my Mac, I used to rely heavily on the first two shortcuts, and taking a screenshot on a Mac was never too easy for me. However, after discovering the last two keywords shortcuts, it became more time-efficient and effortless. This is especially true when I needed to capture multiple screenshots at once.
If you come across any problems, stop the background apps while starting Mac.

Do you know that Mac’s built-in preview app is also a powerful tool to capture and edit screenshots? Well, the applications offer a wide range of advanced features that can take your screenshot game to the next level.
So, here’s how you can use Preview to access the advance screenshot options on Mac:
I often use Preview to add some text annotation to my screenshots, and also when I need to highlight a specific part of my picture.

No doubt that keeping your screenshots organized can be a real headache. But, you know what, there are several strategies that you can employ to maintain an efficient library of screenshots
For instance, I personally use a combination of folder structures that are often separated based on my projects and topics. I then name them descriptively while using a relatable keyword that can help me find them later.
Do You Know?
The world’s first ever screenshot was created with the first interactive computer around the 1960s. And through the 1980s, computers did not really have a built-in feature to take screenshots. (Source: Wikipedia)

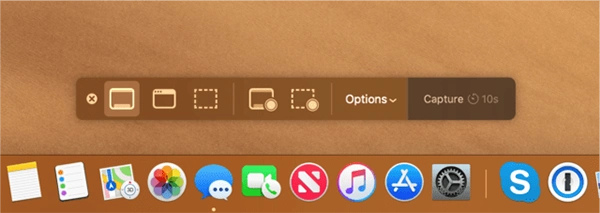
For macOS users, the Mac screenshot toolbar (Command + Shift + 5) is one of the most effective tools that most people ignore. This is a handy tool that you can use to capture a full screen, a selected window, or a specific area of your screen. Additionally, you can also delay the screenshot by adding a timer or quickly edit your screenshots by using built-in editing options.
While screenshots are effective to use in your research and projects, It’s still important to use them wisely. So, here are a few of the best practices to keep in mind:
In brief, mastering the screenshot game has significantly improved my overall workflow. And by accurately mastering the art of screenshot taking in your Mac, you can also effectively use and incorporate it into your projects. Remember, with just a little effort, you’ll be able to capture some stunning screenshots that really impress your audience.
